Thursday, July 5, 2012

Playtime!

I spent most of the 4th of July in my craft-room! I got quite a bit done considering how much we did on our one day off (new spider-man movie, dinner at Outback, 45 minute drive to go see some fireworks, etc.)

The past few lessons have been on painting with watercolors and just doodling shapes. It is so fun and relaxing to just play with color and not have something to "color in".
practicing shapes
trying to put things together
trying something....??
Then, yesterday I played around with adding black pen doodles to the watercolor doodles... Now this, I like! This is the before:

And this is after:


I want to go and play a bit more... but my guys need food! Hope you had a wonderful Independence Day!


Thursday, June 28, 2012

Color Lovin' Catch-Up

Hey Everyone! The kiddo is over at a friend's house, had is first non-camp sleepover so I thought now would be a perfect time to catch you up on what I've been up to!

inktense map

I am still loving my Color Class I'm taking with Joanne Sharpe and am actually keeping up with the classes. That is huge for me!! The quilt looking thing above is a color map of my Derwent Inktense pencils and the pictures below were created using color palettes from the above map.

colorstories1

colorstories2

I had so much fun doing a few sketches of Iceland and coloring them in. Makes me miss it even more!

Next are a few pictures of playing around with a product called Peerless transparent Watercolors. The paint is actually imbedded into strips of paper that you re-activate with water and a paint brush.

Here is the palette I made with the color samples:


And here are a few practice pages getting familiar with the paint:

peerless wc recipes
fearless peerless

So very pretty! And finally, been doing some ink spray pages with stencils and found objects:

Photo2
Photo4
Photo5
Photo1

That's it so far, of course, another lesson will be posted tonight! I can't wait!! Thanks for checking in on me. :0)

Friday, June 22, 2012

Camouflage Cupcakes


That's what AJ asked for his birthday this year, camouflage cupcakes. Thankfully, I already had this one figured out. I made these cupcakes

back in February for a Cupcake Rodeo and knew the technique was going to be used again. A few people asked how I accomplished these, so this time I took a few pictures to try and explain the technique. (this is NOT my original idea, I saw a gal doing it on a youtube video and for the life of me, can't find the video again!! Whoever she was, she's brilliant!!)


After making the frosting and tinting it three different "camouflage colors" I spread each color out onto plastic wrap. 

Pull the edges together to make sure it is completely enclosed. Grab the two ends, one in each hand and twirl in the air. This twists the ends closed and makes a burrito:

Now take one end of your burrito and put it into your decorating bag, it takes a bit of maneuvering.


Pull the plastic wrap out of the metal tip, as far out as you can get it,


Now cut off the plastic sticking out, you are ready to use the bag as you normally would.

Here is an alternate design:

When you are done, just pull out the plastic and toss! The inside of your bag will still be clean and all you'll need to wash is your decorating tip.


Nice! I bought the army men and washed them up before putting them on top. The background is melted chocolate, unfortunately - it wouldn't hold up to the heat so wasn't used. The kids didn't seem to miss it!!


Hope you get a chance to try this, it was so much fun! Happy Birthday, AJ!!

Saturday, June 16, 2012

Postcards

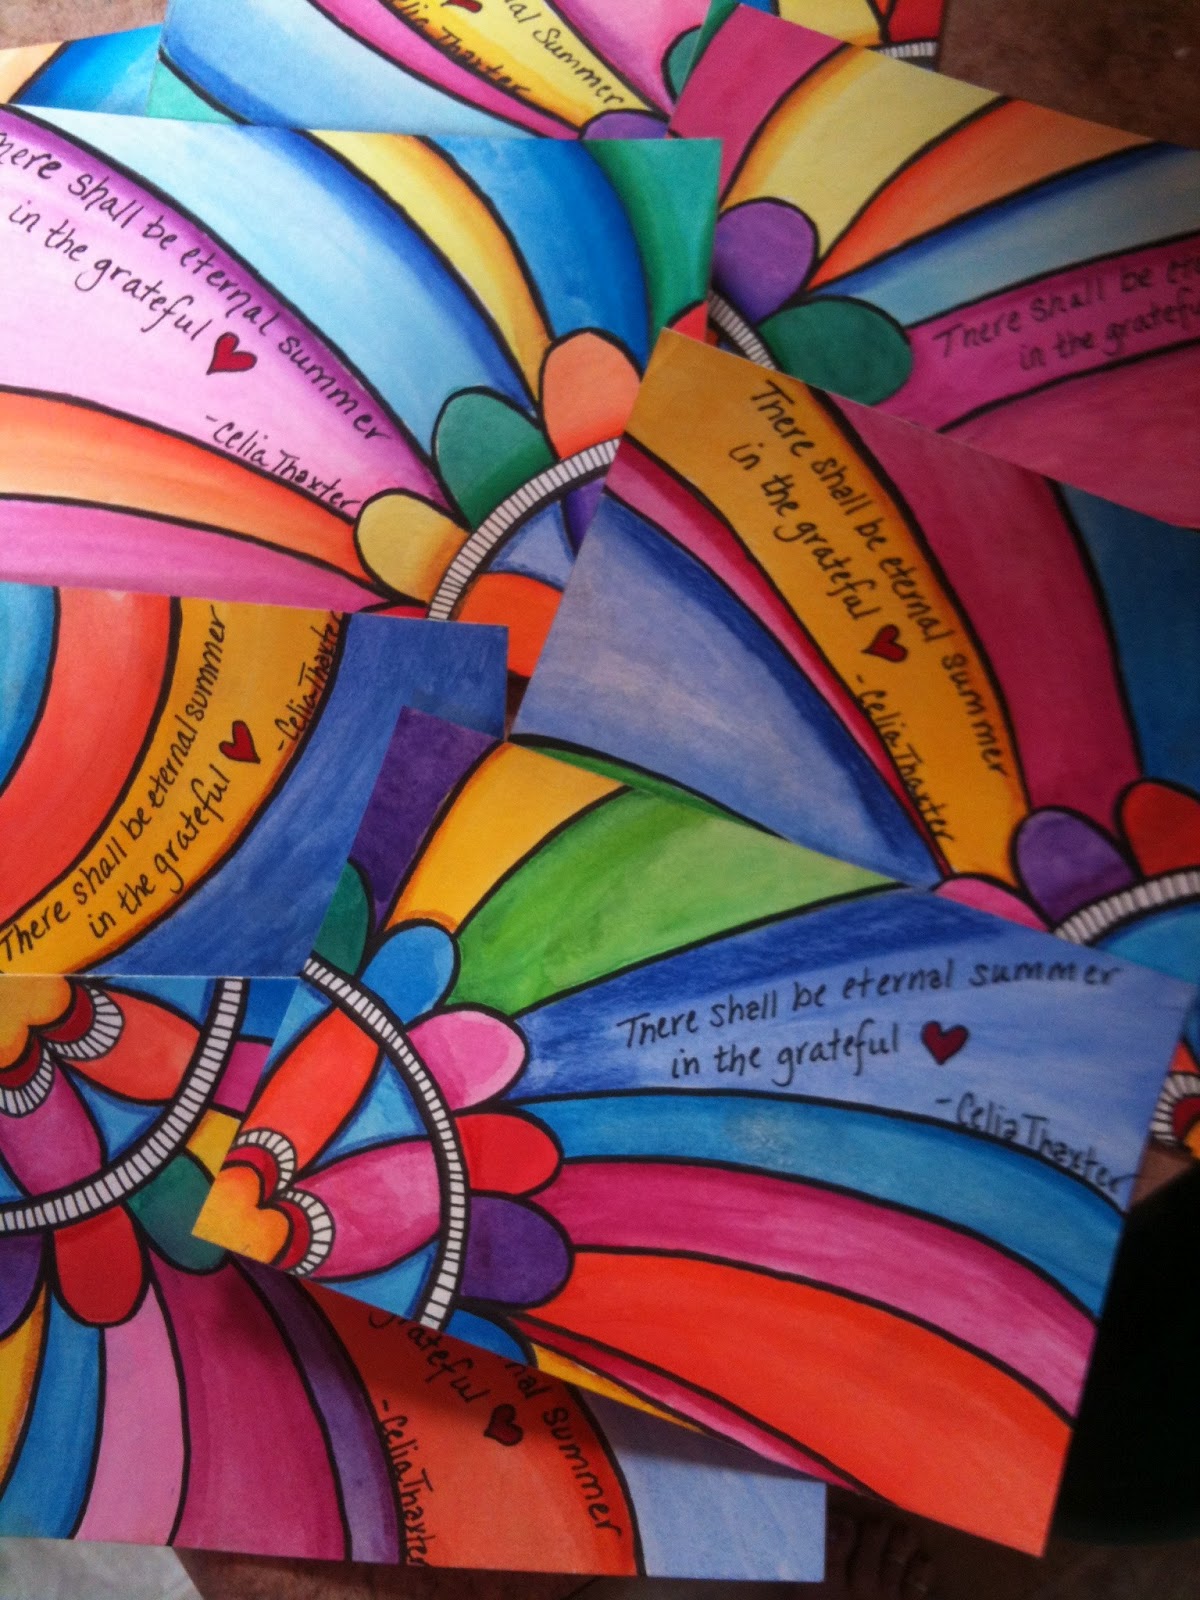
Well, I had so much fun coloring and making the cover page for my practice journal that I had to keep going.  I belong to a postcard exchange group and each month make postcards to send out so I thought this would be a perfect project!

Again I took a picture of my first layer and then of my last layer so you can see the difference. I did two separate 8x12 watercolor sheets so I came out with 4 postcards from each sheet (4x6).

Here is one of the 8x12 inch sheets:
The Start
Finished
After they were done, I chopped them into 4x6 postcards and wrote a quote on them. Ready for the mail!! 


There shall be eternal summer in the grateful heart. ~Celia Thaxter
Don't you just love getting mail!?!


Wednesday, June 13, 2012

Color Love Starts!!

I am having so much fun with my new (and a lot of old) supplies!! The class Color Love 101 with Joanne Sharpe just began on Monday and we are having so much fun. :0) This is a close-up of my cover page to the journal I am working in.

Began on Monday by playing around with the yummy pens, inks and watercolors:


Last night I did a sketch of the picture we were given, it looks mostly the same, just a few little tweaks of my own here and there:

Then did a first layer of color:

Then the final shading and details were added:

I really LOVE how it turned out! The best part about taking the class (besides the great instructor!) is seeing everyone else's take on it. They are all turning out so beautiful!!


Saturday, June 2, 2012

The Summer Catch-Phrase

I have found my catch-phrase for the summer. 


I read a cool blog the other day talking about having a theme for your summer to focus your family so that you get more out of summer instead of ending it and not really having much to show for it. (Please don't ask me, I've tried to find it and have no idea what I was reading. If you know, please leave a comment with the link!) 


I could imagine doing something like, "Our Adventurous Summer", "The Summer of Color", "Flying through Summer" or "A Summer in Bloom" and basing our activities around our theme. We could check out library books, plan day trips, and do crafts all in relation to our theme. Sounds like fun!... Sounds like a lot of work... Sounds like a plan for next year....


This year, instead of a fun theme, I found the catch-phrase that is going to carry me through summer! I'm calling it a catch-phrase because I haven't just said it once. I haven't even just said it once a day. I have caught myself saying it, as if it were a mantra, over and over.


After saying it this morning for the 20th time (it was kind of an A-Ha moment) I decided this would be the catch-phrase of our summer:


Figure It Out


Strange you may think, but it really works on so many levels. If you had a 9 year old son, you'd totally understand. If you had an only child, you would totally understand. Okay -  If you have a kid (or a spouse).... you will totally understand. 


"Mom, I can't get the computer to work."
"Mom, there isn't anything on TV"
"Mom, what day is it today?"
"Mom, why can't I have candy at 8:30am?"
"Mom, I can't find a clean pair of socks."
"Mom, I need a clean spoon."
"Mom, I'm hungry."
"Mom, I'm bored."


"Figure it out."


Now, sometimes it's said sympathetically: "Aw, that's too bad. Guess you'll just have to figure it out." However as we get further into the summer the sympathy has begun to wane and my catch-phrase is all that is left.... I have tried really hard to refrain from screaming it though (I mean, other than in my head). 


So, have you figured out what your summer theme or phrase is yet? Feel free to use mine, it really does work on so many levels! :0)


Friday, June 1, 2012

Wrapping Station


Isn't it pretty!! I know we all have an area like this in our homes dedicated to the purpose of wrapping a gift. What? Why are you laughing?? Oh - you don't have a dedicated area like this? - yea, me neither. This is actually a picture from Country Living and would look ridiculous in pretty much any room of my house. Not that I wouldn't love it - it's just not at all practical. 


What I do have is an ironing board. (I can see you're impressed.) This was the beginning of my gift wrapping station. It is a great height for wrapping gifts, easy to set up and take down, and seldom used for anything else. I do iron, sometimes... occasionally... okay!! Rarely, if ever. Anyhow... moving on. 


So, now I have my table and just need to figure out the rest of the above set up. I have the luxury right now of a guest room, it is used sporadically, but has opportunities for storage. If you have a bit of space in the laundry room, under your bed or your kids bed or even just a corner you have the makings for a gift wrap station as well.


Now, go to Google and do an image search for gift wrap organizers. There is going to be something there that will fit your space, whether it's under the bed or standing up in the corner. This is the one I have, but filled it looks nothing like this:
and here is why - The wrapping paper I bought after Christmas last year is really really wide and sticks out of the top when it's mostly zipped up. I'm okay with that, but if you have some OCDness, I'd be aware of that when shopping. When shopping the after Christmas sales, look for neutral papers that don't scream Christmas - it's a challenge, but it can be done. I bought a bunch of solid papers one year in purples and teals, red is also great and works for Valentine's Day, 4th of July (any of the Patriotic holidays really) and is gender neutral. Also buy one large roll of brown craft paper. You can personalize solids and craft paper in hundreds of ways.

I also do not keep fluffy bows. Why - because unless you are hand delivering the gift to the person within an hour or so, the thing is gonna get squished. It's inevitable, one of Newton's Laws I'm pretty sure  - so why fight against nature. Instead get yourself to Party City or to Oriental Trading Co. and buy two big spools of curly ribbon. One in a boy color or neutral and one in a girly color. 

This one from Oriental Trading is $3.50 for 500 yards. I've had mine for YEARS and still have over half of the spool so make sure you get colors that you like and can be used together or separately and for both genders.  Now go to Google and look up how to make pretty bows using curly ribbon.

What else..... a few gift bags and some tissue paper. A really great pair of scissors and a roll of tape. A pen. That's it! Keep all of this together and threaten the family that the scissors and tape are not to be moved from this spot on penalty of limb amputation. If you can control that, then you've got yourself a wrapping station!!

(Disclaimer: These are NOT my Christmas wrapping supplies! Those are stored with the Christmas tree and ornaments and come out at the appropriate time. There isn't a space large enough for me to include all of the above in addition to all of the crap I have for Christmas wrapping. Just wanted to make that clear in case you were thinking otherwise. Yea, I'm good but I'm not THAT good!!)


Tuesday, May 29, 2012

Color Class

May is so quickly coming to a close and so I thought I had better get in one last post to wrap up the month.

AJ was so excited to finish school - he met one of the major goals he set for himself and he got the teacher he was hoping to for 4th grade. We finalized his timesheet/chore chart for the summer and came to an agreement in the allowance negotiations. He has been going to the chart when he gets bored and is looking for something to do rather than hazarding whatever Mom might pick for him. Perfect!
Cookie waiting for her boy to come play with her.
We've been taking a ton of stuff to Bookman's and decided to do a family puzzle together on the dining room table. We didn't want AJ to get too discouraged so started with a 500 piece puzzle. We did come up with one piece missing - right in the middle of the puzzle!! Oh well. It was fun and we'll go back for another one (another one with a lot less green leaves!).


I am excited! I just got a big ole box from Dick Blick Arts with supplies to go along with an online class I will be beginning soon. I signed up to take "COLOR LOVE 101 - whimsical art journaling" by Joanne Sharpe. It is a 5 week class and will be exploring all kinds of art materials and lettering techniques. I CAN'T WAIT!!! The class starts on June 11th, so I have until then to clear me some space to work in the craft room.
Look at all the pretty new art supplies!!
Well, hopefully I'll have some fun stuff to show you soon and we can get June off to some creative fun around here!! See ya!

Wednesday, May 23, 2012

Summer is Here!!

"School's Out?? Today?? No - seriously. Really?? Today?? Are you sure???"  This was my end of the conversation I have been having with my son and myself all morning long. Add to that the last three days of 104-106 degree temps and it is official - it's definitely summer! Those of you in other parts of the country or without children may disagree, but in our house here in Tucson - summer begins at 12:30pm today and it will be heralded in with a trip to Cold Stone. :0) Now to figure out how to get through the rest of summer!

We have a lot on our plate for this summer, AJ and I. Brian will be doing his thing, working, all summer long without a break it looks like. So AJ and I need to keep busy and try not to get on each other's nerves too badly. Thankfully, he has just discovered that reading is fun and not the chore he once thought. So we will be signing him up for every reading program out there. He is also going to be starting his summer schedule and this year it comes with an allowance! We are all very excited about that. So between the work he'll be doing for me, the chores Dad has lined up for him, and all his normal summer activities - summer is actually looking quite short.

Here is a sampling of what I've been up to this past week:

I am hosting a swap where we are making cards and coordinating 4x4 bag fronts (these will be attached to the front of a plain gift bag). Here is what I did::
This is the card.

Close up of the card front.

the 4x4 piece to attach to a gift bag.
Sorry, my pictures all seem a little blurry - need to figure out why! The next project I did is a tag for a swap I am doing:

The background was an experiment with distress inks and then a transparent modeling paste. I etched into the paste a bit and then added some pearl mist before stamping it with a script stamp. I love how it turned out. The only thing I wasn't happy with is that my calligraphy spread more than I wanted it to. Oh well. Next is an envie I did for a calligraphy swap (address blurred for privacy):


The envelope was first hit with some twinkling H2O's so it looks watercolored, but sparkly. And finally another project with my H2O's - I am part of a monthly postcard swap and so this month I did a resist technique with clear embossing powder and then watercolored on top of the design:


I love how these turned out! Well, that's it for this week, now I need to get in and clean up my mess so I can start in again. Have a great summer and be sure to find time to play!!